Monday, December 29, 2008

Hello, Goodbye and a New Doll


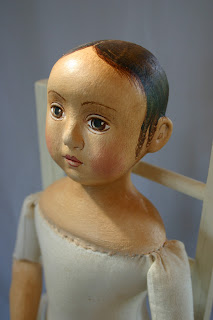
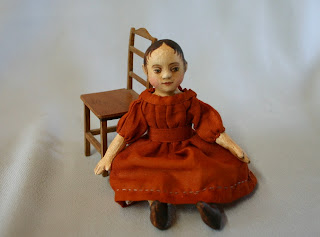
My little Susan Fosnot doll (Gudrun) arrived just before Christmas, but I had to wait until the first mail day after Christmas to pick her up. She is just six inches of cloth doll perfection! If you haven't seen Susan's work, go to www.fosnotdolls.homestead.com You are in for a real treat. I even love the little tag.


At the same time, I have said goodbye to 'Izzy' and 'Ella' - they are on their way to a new home in the USA. I'm pleased that they are staying together in their new home.


In between Christmas festivities (spent this year with my son and his partner, Anna, at Woodbridge overlooking the beautiful D'Entrecasteaux Channel), I managed to make a body for this new doll. I don't often make knee and elbow joints, but this doll has them - jointed hips and shoulders as well, so she is quite mobile. Now I just need to work out how to dress her!

Monday, December 22, 2008

Merry Christmas!


To all who stop by and visit in the next little while, may I wish you a safe and happy Christmas with family and friends and all wonderful things in 2009.


I am spending the next few days with family and will probably not be online at all ..........but I will be back very soon with new work and things to share.


With heartfelt best wishes,


Susie

Sunday, December 14, 2008

"Ella"


I have just completed another Izannah Walker-inspired doll. I have named her "Ella". Here are some pictures: No.1 - With her 'sister' Izzy; no. 2 - back view of her braided hairstyle; no. 3 - full view; no. 4 - closeup.

Tuesday, December 9, 2008

A Busy Week!


I have just arrived home from a busy week in Adelaide. I was there to teach a class for the S.A. Cloth Doll Guild. I ended up with 13 in the class, which was a perfect number, and they were all great workers! The class was instruction in making my 'Moxie' doll, with a couple in the class also requesting instruction in sculpting a doll head. Here is a picture of some of the class hard at work.....(note the wonderful workspace - it is a large classroom at the back of 'Hetties Patch" a quilt shop on Port Road........I was a little worried about the beautiful quilts on display with paint and stuff flying around, but we managed not to get any on them!)
I stayed in the Adelaide Hills with Peta Stuart and her husband, Greg - if there were more like these wonderful people, then there would be a lot less strife in this world. My heartfelt thanks to them both for looking after me so well.

Peta and I worked at night after class (as you tend to when you stay with another dollmaker) and I managed to get some of my own work done - these two zoziedolls and this head.

Peta took me to Strathalbyn on Saturday to visit Lorell Lehman who makes original dolls and fabulous fantasy pieces. She works from a tiny studio attached to an equally tiny gallery - small but perfect. Do yourself a favour and visit http://web.mac.com/lorelllehman


Saturday, November 29, 2008

A redhead!


I ordered some beautiful Tibetan lamb from http://www.fabricaddictions.com/ so I decided to try making another wig for 'Moxie' - gives her a completely different look! Fabric Addictions is a great site if you like making dolls - plenty of the right stuff, like this lambskin, in all sorts of wonderful colours. There is also specialty fabric for dollmakers, patterns and online classes. A dollmakers one-stop shop!

Had a visitor - Allen from Oregon. I showed him what I could of my part of the world, but two and a half days is not really enough time to see Tasmania properly. I think he saw enough, however, to want to come back sometime for a proper look. This old plough on Tamar Island is completely embedded in an oak tree - I fancifully imagine that the farmer rested it against the tree after work one day, and when he next wanted to use it, found that the tree had grown around it!

Saturday, November 22, 2008

Moxie Update


I have been busy preparing to go to Adelaide on December 3 to teach. The students will be using my "Moxie" pattern, so I thought I'd better make an example of the doll dressed as a little girl - the original was a fairy. Here she is. The wig is made from a piece of fur fabric....what a bed-head!

Sunday, November 16, 2008

Saturday, November 15, 2008

Strudelpomme, the apple-elf

This benign little being can sometimes be seen by the astute elf-watcher scavenging in restaurant garbage cans, compost heaps and the like for discarded apple-cores from which the pips are mined. These are carefully saved in his little satchel for later planting where a need is seen.

Wednesday, November 12, 2008

Announcing!


My friend, Di Arnold, has just started her own blog with her own one-of-a-kind dolls featured. Di's dolls are wonderfully quirky and she has a great sense of colour and design. She's been hiding her light under a bushel for too long. Here is one of her dolls. For more go to her blog at http://www.diarnolddolls.blogspot.com/

Saturday, November 8, 2008

...And Another One!


These little dolls are reproducing fast around here. Here's the latest one, and there are more to come......watch this space! These three are all sold.

Tuesday, November 4, 2008

Meet my Zoziedolls


I have been working on some little dolls that are quick to make, and therefore more affordable to buy. They are still one-of-a-kind. I'm calling them 'Zoziedolls' - I had thought of other cool names to call them, but they were already taken. These little dolls are a little bit Maurice Sendak ("Where The Wild Things Are" - remember that?) and a big bit me. I have a number of other variations that I am still working on. You can find them in my Etsy shop if you are interested at http://www.susiemcmahon.etsy.com/

Sunday, October 26, 2008

Old is New


I have been digitally photographing some images of older dolls - long gone to new owners. Here are some of the results: not brilliant photos in terms of clarity, but at least it is a record.

Saturday, October 18, 2008

"Izzy" finished!


In between helping my grand-daughter with a school project, I managed to finish dressing my 'Izannah Walker Homage' doll. I was going to use some old tatted lace that I know I have here somewhere, but in the end I decided it wasn't worth wasting a day trying to find it in the midden-pile that is my studio! But I am quite happy with the little bit of dark red embroidery - I think it is quite in keeping with the fairly plain way that most of these dolls seem to have been dressed originally. Underneath, she has long drawers and a petticoat trimmed with hand-made cotton bobbin lace. (No! I didn't make that).

Wednesday, October 15, 2008

'Izzy' Close-up


Waiting for Clothes


Here is my naked 'Izzy' doll patiently waiting for her new clothes. Painting a doll in a more primitive style was a bit of a challenge - I had to resist the urge to put more detail, shading etc into it!

Tuesday, October 14, 2008

Izannah Homage Doll - Work so far........


After making a tiny (4") replica Izannah Walker doll, I couldn't wait to have a go at making a full size one. Here are some pictures of the work thus far. Next job will be to paint the doll and then make the clothes. There are a few things 'wrong' with this doll - the feet are too big and bulky (the original Izannah dolls have dainty little feet with painted boots) but she's stuck with them - I'll alter the pattern when I make the next one. Also, the proportions are not quite right - on the originals, the head appears to be relatively large, but I can live with this.


The pencilled-in features are only temporary - just to help with the placement.

Wednesday, October 1, 2008

Tiny "Izannah Walker" Doll


Here is a picture of the doll I have made for 'Flora' - I based it on pictures of Izannah Walker dolls, which were cloth dolls made in the USA from the mid C19th.

Sunday, September 28, 2008

Finished! (Well, almost)


These pictures show a little of the wig-making process - you can see the board I use to tension a thread to which the mohair fleece is knotted in tiny clumps. You can also see the wig-cap made from stretch knit fabric fitted to the doll's head.
She is almost finished - she has no (*whispers*) underwear, no shoes and these toys she is holding are borrowed, but she will be completed this week.


Friday, September 26, 2008

.....And More!


With the face-painting largely done, I will put this aside now for a few days, and add any minor touches as I need to. I like a bit of time before declaring a face'done' to look at it and adjust if necessary. I'll start work on the wig, which will be made from hand-knotted mohair, while this little face 'gestates'.

Progress!

After a bit of a break when other things have intervened, I have finally got round to starting the painting of this doll. Her body has been given a flesh-coloured wash and some blushing. I've also put in the finer details, such as fingernails. You can also see where the neck-socket has been lined with felt and the strong elastic cord that will eventually keep head and body together. At this stage you could say that she is beside herself in anticipation of that happening! (Groan)

The head has had several coats of gesso and then four coats of flesh coloured acrylic paint (I use 'Matisse' Artist's Acrylics - superb quality - and I mix the flesh tone myself). The features have been underpainted with Burnt Umber thinned down to watercolour consistency. I tend to work in layers - gradually building up the colour and tone of the face.


Saturday, September 20, 2008

Ready to paint


Here is the little doll almost ready to paint. All the needle-sculpting is done (toes, knees, ankles, bottom, navel, sternum and spine). I just need to work a little more on the head, sanding it back to a smoother finish. It has been coated with four layers of 'goopy stuff' - a mixture of acrylic gel medium, modelling paste and water - this sets very hard and makes the head pretty indestructible.

Friday, September 19, 2008

More Progress

This picture shows all the parts finished, but not yet needle-sculpted. The arms are not attached. I have started to glue on the cloth covering for the head. This needs to be done carefully and in stages, because it is easy to trap an air pocket underneath.

Tuesday, September 16, 2008

Next Steps

The first picture shows the body sketch taken from the finished head, and the pattern drafted from the sketch. Doing it this way helps me to get the proportions right - I think visually, so being able to see it all laid out really helps.

The second picture shows the legs sewn and cut out, but not turned; the arms sewn, but not cut out and the body turned and temporarily stuffed to check the size with the head. It will be 'unstuffed' to do the leg joints. You will also notice that I have pencilled in the features - this helps to make sure there are no major unevennesses. Having said that, I am not hung up on absolute symmetry in a face!


Friday, September 12, 2008

Working Drawings for New Piece


These are some of the rough sketches for the piece I am currently working on.
Related Posts Plugin for WordPress, Blogger...